


Step-by-Step Guide to Calibrating Your BP Doctor for Reliable Results
Dr. (Prof.) Tarun Kumar
Many guides jump straight to button presses and miss the fundamentals. Calibration succeeds when the set-up is right, the comparison device is credible, and the validation is systematic. I will walk through the exact conditions, the checks that matter, and the fixes I use when a reading looks wrong. The goal is simple: a BP doctor that reports numbers I can trust, close to the normal blood pressure range when appropriate, and sensitive enough to flag patterns that may align with hypertension symptoms.
Essential Pre-Calibration Requirements for BP Doctor Smartwatches
1. Proper Device Setup and Positioning Requirements
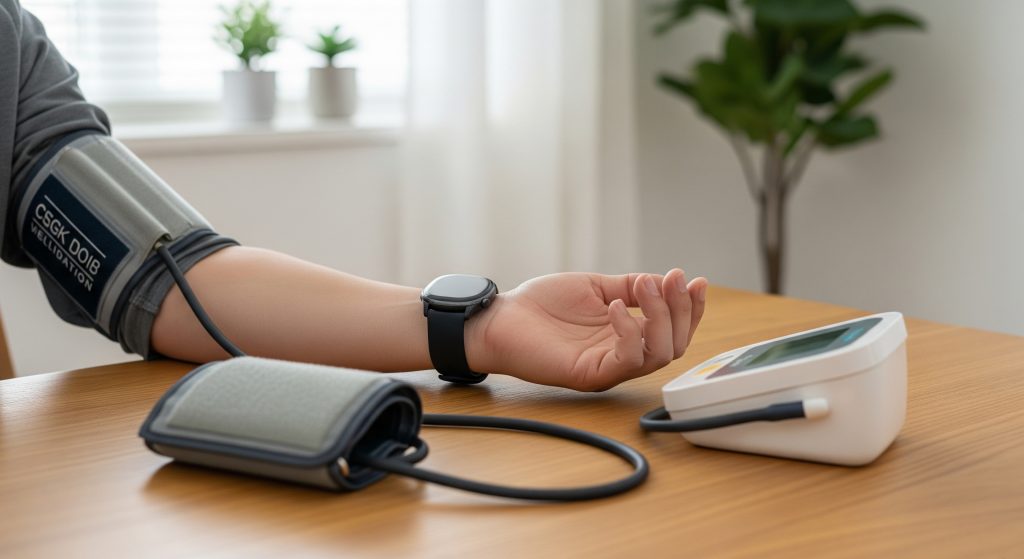
I start with fit and placement. The watch must sit flat on the wrist bone’s proximal side with the sensor centred and stable. The strap should be snug to prevent motion artefacts, but not constrictive. As PubMed Central notes, correct alignment and secure fastening directly improve signal quality. I keep the hand relaxed on a table, palm up, and rest for at least five minutes before calibration. This baseline reduces sympathetic spikes. It also helps the BP doctor capture a steady waveform free of micro-movements that can skew the learning step.
- Remove tight sleeves and jewellery on the measurement arm.
- Position the display on the outer wrist for a repeatable reference point.
- Keep the device and skin clean to improve optical contact.
2. Cuff and Airbag Placement Guidelines
For models with an integrated airbag, placement consistency is critical. I align the inflatable section over the arterial path and avoid folds or gaps. Measurements from upper-arm devices translate best when the cuff sits correctly. As PubMed Central indicates, a cuff positioned 2 to 3 cm above the elbow crease is standard for reference checks. That positioning keeps the pressure profile consistent. When calibrating the BP doctor against an arm device, I mirror posture and support so hydrostatic differences do not creep in.
In short, fit the airbag smoothly and keep the hose or seam oriented as designed. Small rotations can be tolerated by oscillometric devices, though disciplined placement saves time during validation.
3. Environmental Conditions for Accurate Calibration
Calibration in a stable environment avoids drift. I target a quiet room, mild temperature, and low humidity swings. Sit upright with back support and both feet flat. Crossed legs or a slouched posture will shift readings. I schedule sessions away from caffeine, nicotine, or a recent workout. The BP doctor learns your baseline from these conditions, so I repeat them during future checks to keep the model aligned.
- Room temperature: consistent and moderate.
- No talking during measurement.
- Wait at least 30 minutes after meals or intense activity.
4. Battery and Power Management Considerations
Low power creates unstable pump behaviour and weak sensor illumination. I keep the watch above 40 percent charge before calibration. Charging during measurement can introduce electrical noise, so I avoid it. If the BP doctor shows atypical inflation timing or slow deflation, I recharge, reboot, and retest. Stable power equals stable pressure curves.
- Update the device only when it has sufficient battery.
- Disable unnecessary background tasks during calibration.
- Restart if the device has been on for many days without a power cycle.
5. App Synchronisation and Firmware Updates
I confirm that the companion app is logged in, permissions are granted, and time zones match. Outdated firmware often explains odd behaviour. Apply updates, resync, then clear any stale sessions if the dashboard shows gaps. The BP doctor should reflect the same time stamps and trend lines across watch and app. Where possible, I export a baseline to a CSV and retain it for later comparisons.
Calibration Methods and Validation Techniques
1. Manual Calibration Against Professional Devices
I prefer a direct, controlled comparison against a validated upper-arm monitor. Rest for five minutes. Take three back-to-back readings on the arm device. Then take three on the BP doctor under the same posture and support. If the average systolic and diastolic differences stay small and consistent, I store the calibration. If not, I repeat after a short pause. This manual loop is simple and disciplined. It also mirrors how clinics verify home monitors in practice.
- Prepare posture and environment.
- Record three reference readings.
- Record three device readings.
- Compare means and note spread.
2. Side-by-Side Comparison Testing Protocol
Timing matters. I alternate readings to reduce physiological drift: reference, watch, reference, watch, and so on. I keep the arm supported at heart level for every measure. I avoid switching arms mid-test. The BP doctor benefits from alternating because it minimises changes in vascular tone between measurements. If a variance trend appears, I capture it in a short table and look for posture or strap deviations first.
- Use the same arm and position throughout.
- Allow 60 to 90 seconds between readings.
- Discard any reading with movement or cough.
3. Multi-Measurement Validation Process
Single pairs are noisy. I aim for at least six valid pairs across two sittings. Morning and evening samples expose diurnal variance and stress effects. If the BP doctor sits within a tight band across those pairs, I accept. If the spread is wide, I revisit fit and environment. Then I repeat the series. Robust sampling prevents false confidence. It is basically a quality gate for home metrics.
4. Reference Device Selection Criteria
Not all references are equal. I look for an upper-arm device with known validation against international standards. As Hypertension notes, the AAMI, ESH, and ISO collaboration produced a universal validation framework for blood pressure devices. I choose monitors listed as compliant or tested under similar criteria. I also check cuff size suitability and recent calibration status. A poor reference ruins an otherwise careful procedure, and it wastes time.
5. Acceptable Accuracy Thresholds and Standards
For home use, a pragmatic target is mean differences within a few mmHg and small standard deviations. Absolute zero is unrealistic. As FDA guidance explains, non-invasive monitors should be validated against recognised performance criteria to support clinical utility. I adopt a practical acceptance range and document it for later checks.
|
Metric |
Practical acceptance band |
|
Systolic mean difference |
Within 5 to 10 mmHg, ideally closer to 5 |
|
Diastolic mean difference |
Within 5 to 8 mmHg |
|
Pattern consistency |
Differences stable across multiple sessions |
I cross-check these bands with clinician expectations to ensure the BP doctor remains useful for trend tracking and decision discussions.
Troubleshooting Common BP Doctor Calibration Errors
Error Code 25: Movement Detection Issues
Error 25 usually points to motion artefact or tremor during inflation. I instruct the user to relax the forearm and avoid talking. I also reduce ambient vibration by moving away from appliances or traffic. If repeated flags occur, I switch to a table with better stability. The BP doctor is sensitive to micro-shifts that feel trivial but distort the pressure curve. Calm and stillness solve most of these alerts.
- Rest 5 minutes before retries.
- Support the elbow and wrist at heart level.
- Silence notifications to prevent micro-movements.
Error Code 30: Strap Tightness Problems
This error reflects an overly tight or loose band. I reseat the device one finger tight, ensuring uniform contact around the wrist. If the watch leaves a pronounced mark, it is too tight. If it slides, it is too loose. As BP Doctor explains, correct strap tension prevents pressure artefacts and maintains measurement integrity. Once tension is corrected, the BP doctor typically clears the error within one or two attempts.
Connection and Bluetooth Syncing Failures
Pairing problems often masquerade as calibration failures. I reset Bluetooth, forget the device in the app, and re-pair. I verify permissions for location and background activity. If the clock time differs across phone and watch, I sync time first. The BP doctor should show completed measurements in the app within a minute. If not, I check firmware, then reinstall the app to clear corrupted caches.
- Toggle Bluetooth and restart both devices.
- Re-pair and confirm time sync.
- Update firmware, then retest calibration.
Inconsistent Reading Patterns
When readings jump, I look for repeatable causes. Recent caffeine, poor sleep, or a missed antihypertensive dose can explain real spikes. But still, hardware issues occur. I compare with a reference device under controlled conditions. If the BP doctor tracks the rise and fall but runs high by a fixed offset, I recalibrate. If the spread is chaotic, I inspect for strap wear, sensor contamination, or leaks in the inflatable module.
- Recreate conditions across two sessions to confirm pattern.
- Check the wrist position and arm support carefully.
- Reboot and repeat a six-pair validation.
Airbag Inflation and Deflation Errors
Interruptions in pump cycles often reflect low battery or occlusion. I examine the air path for kinks and confirm the vent is unobstructed. The inflation should be smooth, with a controlled deflation profile. If it is ragged, I power cycle and recharge. The BP doctor depends on a predictable pressure ramp. Any leak or stutter forces the algorithm to guess, which harms calibration quality.
Maintenance Schedule and Long-Term Accuracy Management
Recommended Calibration Frequency Guidelines
Routine checks keep drift in check. I recalibrate after firmware updates, after strap replacement, and on a fixed cadence. Monthly quick checks work for frequent users. Quarterly checks suit lighter use. Manufacturer guidance is the baseline, and I augment it with my usage pattern. The BP doctor remains trustworthy when recalibration is regular, not reactive.
- After updates or repairs: immediate quick validation.
- Frequent users: monthly six-pair check.
- Infrequent users: quarterly check with a clinical reference.
Post-Impact and Environmental Change Checks
Drops, heat, or humidity shifts can alter behaviour. If a device falls or travels to a different climate, I run a short validation. Elevated temperature can affect oscillometric readings, roughly speaking, by shifting sensor response curves. I also inspect the strap and airbag after any impact. The BP doctor should be re-anchored to a new baseline when the environment changes meaningfully.
- After travel across climates: quick two-session comparison.
- After impact: visual inspection, then a controlled reading series.
- After storage in heat or cold: allow acclimatisation before use.
Cuff and Sensor Maintenance Procedures
Clean equipment produces clean data. I wipe the device with a soft damp cloth and avoid harsh solvents. Dry completely before use. I check the airbag seam for wear and confirm connectors seat firmly. If the watch has removable liners, I wash and dry them thoroughly. The BP doctor benefits from routine inspections, especially if shared. Hygiene matters for the numbers and for safety.
Clean, dry, intact cuffs and sensors reduce noise and extend accurate service life.
- Inspect for cracks, fraying, or glue lift on the airbag seam.
- Disinfect per manufacturer instructions and allow full drying.
- Replace worn parts proactively to prevent creeping error.
Storage Best Practices for Device Longevity
I store the device in a cool, dry place away from direct sunlight. Extreme heat degrades polymers and battery health. Extreme cold affects pump performance. A simple pouch protects from dust and minor impacts. Before a long break, I charge to about half, power down, and store it flat. The BP doctor will wake with fewer surprises when treated like precision equipment.
Professional Service Intervals and Indicators
DIY checks are useful, yet periodic professional verification adds assurance. If calibration fails repeatedly, or if the device shows unstable pressure curves, I schedule a service. Look for certified centres familiar with the device family. Provide your recent validation logs. The BP doctor is easier to diagnose when the technician can see the context, not just the symptom.
- Annual professional check for heavy use or clinical dependence.
- Immediate service after fluid ingress or severe impact.
- Service if offsets exceed your acceptance band persistently.
Conclusion
Reliable home readings come from disciplined conditions, a credible reference, and a calm, repeatable method. Set the environment, stabilise posture, and validate with enough pairs to smooth noise. Use a standard-compliant reference device and document your acceptance bands. When anomalies appear, work the checklist methodically and fix root causes, not symptoms. The BP doctor can be a precise trend tool and a sensible early warning system. Treat it like an instrument, and it will behave like one.
How often should I calibrate my BP Doctor smartwatch for optimal accuracy?
I recommend a quick check monthly for regular users and quarterly for light users. Trigger immediate recalibration after firmware updates, strap changes, travel across climates, or any drop. The BP doctor benefits from routine verification rather than waiting for obvious drift.
What is the acceptable difference range between BP Doctor and professional monitor readings?
For practical home use, aim for mean differences within 5 to 10 mmHg systolic and 5 to 8 mmHg diastolic, with consistent patterns. If your BP doctor stays inside those bands across sessions, it is performing acceptably for trend tracking.
Can I calibrate my BP Doctor without visiting a healthcare professional?
Yes, provided you use a validated upper-arm monitor as your reference and follow a structured multi-reading protocol. Document posture, timing, and conditions. If your BP doctor shows persistent or widening offsets, seek a clinical comparison to rule out technique errors.
Why does my BP Doctor show different readings when connected versus disconnected from my phone?
Sync timing, time stamp mismatches, or background tasks can affect displayed averages and recent reading lists. Ensure time is synchronised, Bluetooth is stable, and the app is updated. The BP doctor should produce identical raw readings irrespective of connection, given identical conditions.
What should I do if calibration fails after multiple attempts?
Reset the environment and posture, reseat the strap, recharge, and repeat a six-pair alternating series. If differences remain large and unstable, try a different validated reference device. Persistent failure suggests hardware issues. Book a service check and bring your logs from the BP doctor app.
How do temperature and humidity affect BP Doctor calibration accuracy?
Temperature shifts can alter sensor behaviour and air properties, which changes pressure profiles to an extent. High humidity may affect comfort and contact. Recalibrate after significant environmental changes so your BP doctor learns the new baseline under controlled conditions.
Quick clinical context: The normal blood pressure range for many adults often centres near 120 over 80 mmHg, depending on guidance. If readings trend higher and align with hypertension symptoms like headaches or occasional dizziness, consult a clinician. If values run low and coincide with faintness, consider common low blood pressure causes such as dehydration, medications, or illness, and seek professional advice. The BP doctor is a monitoring tool, not a diagnosis.