


How to Use Pimple Patches for Fast, Overnight Acne Relief
Dr. Payal Gupta
Most advice treats every blemish the same. That is why results fall short. A Pimple Patch can be highly effective, but only when matched to the right stage of a spot and applied with discipline. This guide lays out the exact steps, the science, and the small adjustments that turn a decent result into a fast, overnight improvement.
Step-by-Step Guide to Using Pimple Patches for Maximum Results
1. Cleanse and Dry the Affected Area
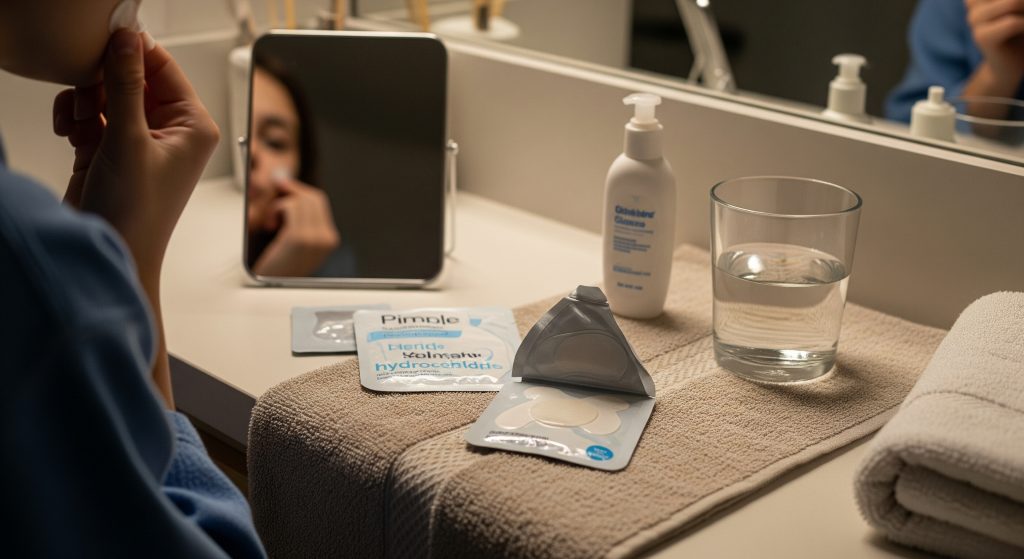
Begin with a gentle, non-stripping cleanse. Your aim is a clean, oil-free surface so the Pimple Patch can adhere fully. Pat dry carefully. Allow the skin to air dry for 1 to 2 minutes. Any residual moisture will weaken adhesion and reduce capacity to draw fluid.
-
Use lukewarm water to avoid vasodilation and redness.
-
Avoid oils, emollient cleansers, and occlusive balms before the patch.
-
If you have just showered, wait until the skin is completely dry.
Clean skin is non-negotiable. Adhesion equals results.
2. Choose the Right Patch Size
Match the patch to the lesion with 1-2 mm of clear margin. The hydrocolloid must fully cover the whitehead or area of serous fluid. A Pimple Patch that is too small will leave edges lifting and reduce the vacuum-like seal. One that is too large can overlap healthy skin and feel uncomfortable.
-
Small round patches suit pinpoint whiteheads.
-
Larger dots help clusters or larger pustules.
-
Thin, tapered edges reduce snagging on pillowcases.
The correct size does more than fit neatly. It preserves the microenvironment needed for quick decongestion.
3. Apply the Patch Correctly
Peel the film without touching the centre. Place the Pimple Patch directly over the spot and press for 5-10 seconds. Heat from your fingertips helps the adhesive set. Ensure there are no visible air bubbles under the patch.
-
Anchor one edge first for precise placement.
-
Smooth outward to seal the perimeter.
-
Do not reposition repeatedly, as adhesive performance drops each lift.
Precision at this stage prevents early lifting and contamination.
4. Leave Overnight or 6-8 Hours
Hydrocolloid dressings need contact time. Leave your Pimple Patch for 6-8 hours or overnight. The material absorbs exudate and maintains a slightly moist environment. This assists the body in clearing debris and reduces the urge to pick.
-
Resist the temptation to peek. Movement breaks the seal.
-
If the patch saturates well before 6 hours, you may replace it once.
-
For day wear, choose ultra-thin transparent patches to reduce visibility.
Time under occlusion is your multiplier. Short wear time yields modest results.
5. Remove and Assess Results
Lift the edge slowly and peel back on itself. Do not rip upwards. A good Pimple Patch will show an opaque or white centre where fluid has been absorbed. The spot should look flatter and calmer.
-
If there is residual fluid, you may apply a fresh patch for another 6 hours.
-
If the area is flat and sealed, move to aftercare rather than re-occlusion.
You are judging two things: reduced swelling and reduced shine from exudate. Those indicate success.
When to Apply Multiple Patches
Multiple patches are useful for clusters or sequential saturation. If a Pimple Patch turns fully white quickly, replace it once to continue absorption. For several adjacent pustules, use separate patches for each lesion rather than one large sticker. This preserves a tight seal per spot and improves efficiency.
-
Limit total occlusion time to 24 hours per site to avoid over-maceration.
-
Space patches slightly to prevent edge lifting where they touch.
Two cycles often outperform one long wear session. Fresh capacity, faster clearance.
Day vs Night Application Strategy
Night wear offers the longest uninterrupted window. Your pillow will not disturb a well-sealed Pimple Patch if edges are thin. Day wear suits situations where you must avoid touching or you need discreet coverage. Choose ultrathin patches for work or travel. They reduce shine and create a smoother surface under light makeup.
-
Night: deeper absorption window and minimal movement.
-
Day: behavioural control, especially for habitual picking.
Use both strategically. Night for heavy lifting, day for protection and upkeep.
How Hydrocolloid Patches Work on Different Acne Types
Science Behind Hydrocolloid Technology
Hydrocolloid is a moisture-retentive dressing used in wound care. It absorbs exudate and forms a gel. In acne care, the Pimple Patch creates a cleaner, sealed environment that encourages debris to lift towards the surface. It also acts as a barrier against bacteria and hands.
Many people ask, how do pimple patches work. In short, the polymer matrix draws fluid while maintaining moisture balance. This reduces inflammation to an extent and visibly deflates raised lesions. When people refer to hydrocolloid bandages for acne, they are referring to this exact effect leveraged on small, localised blemishes.
Hydrocolloid supports moist wound healing, which is arguably the fastest path to flattening exudative lesions with minimal disruption.
It is basically clean physics and good wound care hygiene applied to spots.
Whiteheads and Pustules
These lesions contain superficial pus and fluid. A Pimple Patch can reduce height within hours because the contents are near the surface. The occlusive layer creates gentle pressure, and the absorbent core pulls exudate into the gelled centre. Results are usually visual and prompt.
-
Expect noticeable flattening after 6-8 hours in many cases.
-
Redness may persist, but swelling typically reduces markedly.
Think of this as targeted, hygienic decongestion with minimal trauma.
Early-Stage Pimples
At the first sign of tenderness with no visible head, your Pimple Patch serves two roles. It shields the area from friction and dissuades touching. It may also shorten the time to surface formation by stabilising the environment. However, absorption is limited until a head forms.
This is preventive care. Not a magic eraser.
Cystic Acne Considerations
Deep, nodular cysts sit beneath the surface. A Pimple Patch will not drain a lesion that has no channel to the skin. You may still benefit from the barrier function to avoid trauma. For active treatment, consider topical anti-inflammatories or clinical options as advised by a professional.
-
Do not force drainage. That invites scarring and prolonged inflammation.
-
If pain is significant, cold compresses for 5 minutes may help temporarily.
Use patches judiciously here. Protection, not cure.
Post-Extraction Care
After safe extraction of a superficial whitehead, apply a Pimple Patch to contain residual fluid and protect the opening. The hydrocolloid environment can reduce crusting and lower the risk of contamination. Keep the area occluded for 6-8 hours, then switch to light, non-occlusive care.
This is where hydrocolloid performs beautifully. Quick sealing, cleaner healing.
Common Mistakes When Using Acne Patches
Applying to Unprepared Skin
Oils, residue, or dampness undermine adhesion. If a Pimple Patch lifts at the edges, it cannot maintain the proper seal. Always cleanse, dry, and wait briefly before application. If skin is very oily, swipe once with alcohol-free toner and let it dry fully.
Preparation is not optional. It is the foundation.
Using on Wrong Pimple Types
Hydrocolloid works best for exudative lesions at or near the surface. Applying a Pimple Patch to a deep cyst wastes product and time. Use topical anti-inflammatory agents for depth. Save patches for whiteheads, pustules, and late-stage papules with soft centres.
Right tool, right task.
Removing Patches Too Early
Interrupting wear at 1-2 hours seldom helps. The material needs time to absorb. Leave your Pimple Patch until the centre looks opaque or the time window is complete. Early removal increases the chance of reaccumulation.
Patience converts potential into visible results.
Layering with Skincare Products
Applying serums or creams underneath will break the seal. Keep the skin bare under the Pimple Patch. If you need active ingredients, apply them around the patch perimeter, not beneath it. After removal, you can reintroduce your routine.
-
SPF around the patch during the day is appropriate.
-
Retinoids should not be layered under the patch.
Order matters here. Occlusion first, then actives later.
Reusing or Cutting Patches
Reusing a Pimple Patch is unhygienic and ineffective. Cutting patches can create edges that lift and collect debris. Use them as designed. The product relies on an intact adhesive border to sustain a stable microenvironment.
Shortcuts cost more than they save.
Maximising Results with Pimple Patches
Pre-Treatment Preparation Tips
Preparation improves adhesion and outcome. Before applying your Pimple Patch, wash hands, cleanse the area, and avoid fragrances that may irritate. If you must exfoliate, use a very mild chemical exfoliant 12-24 hours earlier, not immediately before application.
-
Clip or secure hair to prevent friction.
-
Use a clean towel dedicated to your face.
-
Replace pillowcases frequently to reduce contamination.
Small hygiene habits compound. Cleaner surface, cleaner healing.
Combining with Spot Treatments
A Pimple Patch pairs well with actives when timing is managed. Apply the patch on bare skin for the occlusive cycle. After removal, you can apply a thin layer of benzoyl peroxide or salicylic acid around the site, not under the next patch. This alternation reduces irritation while preserving occlusion benefits.
|
Step |
Reason |
|---|---|
|
Patch on bare skin |
Maximum seal and fluid absorption |
|
Remove after 6-8 hours |
Avoid over-maceration |
|
Apply light active around site |
Address bacteria and clogged pores |
|
Reapply patch if fluid persists |
Continue clean absorption |
This staggered approach is deliberate. It limits conflict between adhesives and actives.
Aftercare Following Patch Removal
Once you remove the Pimple Patch, assess whether the skin surface is intact. If there is an opening, keep aftercare gentle. Apply a bland moisturiser with soothing agents such as panthenol or centella. During the day, use broad-spectrum SPF 30+. Sun exposure deepens marks.
-
Avoid scrubs or strong acids for 24 hours post-removal.
-
Consider a thin occlusive layer at night if the site remains weepy.
Good aftercare reduces the risk of pigmentation and speeds resolution.
Preventing Scarring and Marks
Picking creates mechanical trauma and pigment issues. A Pimple Patch acts as a behavioural barrier. After the lesion flattens, introduce a gentle retinoid or azelaic acid on alternate nights, as tolerated. These support even tone without aggressive irritation.
Pros vs Cons of Post-Patch Actives
-
Pros: Better tone, fewer marks, improved texture over time.
-
Cons: Potential irritation if applied too early or too thickly.
Prevention outperforms correction. Every time.
Making Pimple Patches Work for Your Skin
No single format suits everyone. The correct Pimple Patch for you depends on lesion type, skin sensitivity, and daily routine. Some prefer ultrathin daytime dots for discretion. Others value thicker night patches with higher absorption capacity. If you are seeking the best acne patches for frequent whiteheads, prioritise strong adhesion, tapered edges, and reliable hydrocolloid density.
Skin type also matters. If you are reactive, choose patches with minimal additives and medical-grade adhesive. If you produce heavy oil, consider a quick degrease with a mild, alcohol-free toner before each Pimple Patch. For athletes or those in humid climates, carry a travel case. Replace a lifted patch promptly to maintain the seal.
Two quick examples clarify the approach. A small, visible pustule before an event benefits from a thin, daylight Pimple Patch to reduce shine and prevent touching. A stubborn, fluid-filled whitehead before bed does better with a thicker night patch worn for 8 hours. Different tools, different wins.
For those who prefer a more medical framing, think of these as hydrocolloid bandages for acne in targeted form. They operate like small dressings with cosmetic discretion. If you wonder how do pimple patches work in a busy week, the answer is consistency. Apply correctly, allow full wear time, and pair with measured aftercare.
There is an industry shorthand worth knowing. Occlusion plus time equals flattening. In product teams, this is sometimes summarised as OCT. It is not an official standard, but the logic holds. Your Pimple Patch is the occlusion, and time is the lever.
Frequently Asked Questions
Can I wear makeup over pimple patches?
Yes, if the patch is designed for daytime wear and has a matte, ultrathin finish. Apply the Pimple Patch first on clean, dry skin. Then use a small amount of non-oily concealer or mineral powder around the edges. Do not force heavy foundation over the centre. That risks lifting. Light layers are safer and more convincing.
How often can I use hydrocolloid patches?
You can cycle a Pimple Patch up to two or three times on the same lesion over 24 hours, as long as the skin does not appear overly macerated. Replace a saturated patch after 6-8 hours. If the area is flat and dry, stop occlusion and focus on soothing care and SPF. Frequency should follow the course of the lesion, not the clock.
Do pimple patches work on blackheads?
Not directly. Blackheads are oxidised plugs sitting within pores without active exudate. A Pimple Patch will not extract a dry comedone. Use salicylic acid, retinoids, and periodic gentle extractions performed safely. Patches excel at whiteheads and pustules, where fluid absorption is possible and helpful.
Why did my patch turn white?
The centre turns white as the hydrocolloid absorbs fluid and forms a gel. This is the sign that your Pimple Patch engaged properly with exudate. If the patch stays clear, the lesion likely lacked surface fluid or the seal was incomplete. Correct placement and adequate wear time usually resolve this.
Can children use acne patches safely?
Generally yes, for superficial spots, provided the child is not allergic to adhesives. Choose simple Pimple Patch formulas without added actives. Supervise application and removal to avoid tugging. For persistent or cystic acne, seek professional guidance. Sensitive, developing skin benefits from a cautious approach.
Should I lance my pimple before applying a patch?
No. Lancing increases the risk of infection and scarring. Apply a Pimple Patch to a visible whitehead or pustule and allow it to absorb fluid naturally. If an opening occurs after gentle cleansing, the patch will help contain and protect it. Reserve manual extraction for trained hands or low-risk lesions.