


How to Treat a Sprained Ankle at Home and Heal Faster
Dr. Neetan Sachdeva
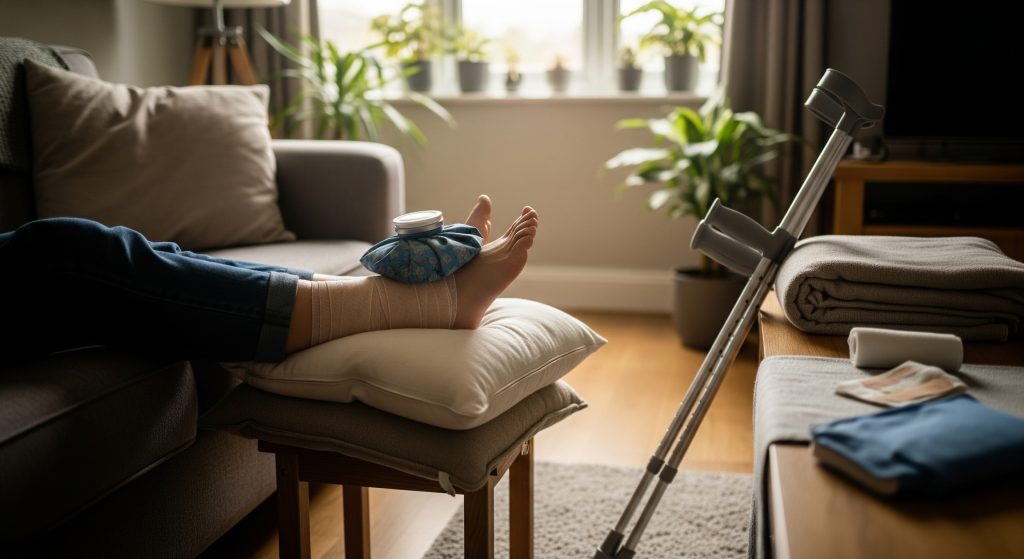
“Just rest and wait it out” sounds sensible for an ankle sprain. It also slows recovery when used in isolation. I use a simple, structured plan for sprained ankle home treatment that protects the joint, reduces swelling quickly, and restores movement without guesswork. You will find a clear sequence below, plus practical wrapping guidance, realistic ankle sprain recovery time expectations, and the right exercises to regain stability. Precision matters here. Small choices in the first 48 hours create large differences a week later.
Immediate Treatment Steps for a Sprained Ankle
1. RICE Protocol Application
I start with RICE because it manages pain and swelling in a predictable way. As Cleveland Clinic outlines, rest, ice, compression, and elevation help control acute inflammation, with icing for 15-20 minutes every 2-3 hours during the first 48 hours and elevation above heart level improving fluid return. Those specifics keep swelling in check and limit early stiffness.
-
Rest: I avoid painful loading. Short, pain-free movement is acceptable if it does not increase symptoms.
-
Ice: I use wrapped ice or a cold pack. Never place ice directly on skin.
-
Compression: I apply a snug elastic wrap to support the joint and discourage fluid build-up.
-
Elevation: I keep the ankle above heart level whenever possible, including during sleep.
Total inactivity can be counterproductive. Once the acute spike in swelling settles, I resume gentle, pain-free motion. That balance protects the ligament while preventing avoidable stiffness. It is basically control first, then cautious mobility.
I treat this stage as the foundation of sprained ankle home treatment. Done well, it shortens the messy middle of recovery.
2. Pain Relief Methods
Pain control is both humane and strategic. If pain is lower, movement quality improves. I combine RICE with over-the-counter analgesics when appropriate and medically safe. Non-steroidal options can help with pain during the first days, while paracetamol may be sufficient for milder sprains. I avoid stacking multiple drugs without pharmacist or GP advice. I also avoid topical heat in the acute phase because it can increase swelling.
Two practical additions often help:
-
Short bouts of ankle pumps within comfort. These can reduce pooling and ease throbbing.
-
Gentle calf massage away from the tender area. This supports circulation without stressing the ligament.
My rule is simple. If a method reduces pain and does not increase swelling after two hours, I keep it.
3. How to Reduce Swelling in a Sprained Ankle
Swelling control is not cosmetic. It preserves range of motion and shortens downtime. For how to reduce swelling in a sprained ankle, I prioritise three actions: frequent elevation, well-fitted compression, and timed cold therapy. As Mayo Clinic notes, short, repeated ice applications during the first 48 hours and consistent elevation are effective for reducing fluid accumulation.
-
Elevation: I stack pillows so the ankle sits clearly above the heart.
-
Compression: I recheck tension after 15 minutes. If the toes tingle or change colour, I loosen the wrap.
-
Cold therapy: I use brief, regular sessions rather than a single long exposure.
I also keep the foot actively moving within comfort. Ankle pumps, alphabet tracing, and toe spreads encourage fluid movement. Small, frequent inputs. That is the pattern.
4. When to Seek Medical Attention
Not every sprain is a simple sprain. I seek medical assessment promptly if any of the following is present:
-
Inability to bear weight for several steps.
-
Severe, escalating pain or rapidly increasing swelling.
-
Numbness, tingling, or unusual coldness in the foot.
-
Deformity, a cracking or popping sensation at injury, or significant bruising appearing very quickly.
-
Signs of infection after skin breaks, such as spreading redness and warmth.
These features suggest more than a routine ligament sprain. Syndesmosis injuries or fractures require targeted care. Early clarity prevents chronic instability later. Better a cautious X-ray than months of frustration.
5. First 48 Hours Care Plan
The first two days set the tone. I use a simple plan that aligns with effective sprained ankle home treatment:
-
Protect and position: Avoid painful weight bearing. Use a brace or crutches if walking triggers pain. Elevate whenever seated or lying.
-
Cold and compression: Apply short, regular cold sessions through the day. Maintain a snug, comfortable elastic wrap.
-
Gentle movement: Perform ankle pumps and circles inside a pain-free arc. Stop if throbbing increases later.
-
Sleep setup: Prop the ankle on a pillow so it sits above the knee and hip. Keep the wrap comfortable, not tight.
-
Checkpoints: Reassess swelling, pain at rest, and pain during light steps each morning and evening. I only progress activity if these improve or remain stable.
Under this plan, swelling reduces steadily and confidence returns. That is the early win that speeds everything else.
How to Wrap a Sprained Ankle Properly
Materials Needed for Ankle Wrapping
-
Elastic bandage (medium width) or cohesive wrap.
-
Foam or gauze underwrap if skin is sensitive.
-
Medical tape to secure the end.
-
Clean, dry skin (a quick wash and dry prevents slippage).
-
Optional: a lace-up or stirrup-style brace for extra stability during walking.
Good materials and a two-minute check of skin condition prevent most problems. Simple preparation prevents blisters and slippage.
Step-by-Step Wrapping Technique
This is how to wrap a sprained ankle with reliable compression and support. I use a figure-of-eight method because it controls swelling and limits inversion without blocking circulation.
-
Start at the mid-foot: Anchor the wrap just behind the toes with light tension.
-
Cover the foot: Wrap towards the heel, overlapping each turn by half the width.
-
Figure-of-eight: Pass the bandage under the arch, across the top of the foot, then around the back of the heel.
-
Up the ankle: Continue the figure-of-eight, crossing in front of the ankle and wrapping above the ankle bones.
-
Tension check: The wrap should feel snug but not tight. Toes should remain warm and pink.
-
Secure: Finish 5 to 7 centimetres above the ankle joint. Fix the end with tape. Recheck after 10 to 15 minutes.
I rewrap if I notice numbness, colour changes, or a throbbing sensation. Compression should help pain, not create new symptoms.
Common Wrapping Mistakes to Avoid
-
Uneven tension that creates pressure spots and compromises circulation.
-
Wrapping too tightly and causing pins and needles or cold toes.
-
Wrapping immediately after a large swelling surge, which can trap fluid and increase discomfort.
-
Skipping skin preparation, which raises the risk of blisters and slippage.
-
Leaving tape on for prolonged periods, which can irritate skin.
The test is simple. If the wrap reduces pain during walking within minutes and the foot remains warm, it is likely correct.
Alternative Support Options
Elastic wraps are versatile. Some cases benefit from more structured support. A lace-up brace limits side-to-side movement well. A semi-rigid stirrup brace controls inversion and eversion during early walking and stair use. Soft compression sleeves are comfortable for low-demand situations and sleep. For sport or heavy work, I prefer a brace that combines lace-up support with figure-of-eight straps.
Choice depends on irritation tolerance, swelling, and the required level of control. For example, runners with prior sprains often respond well to a lightweight stirrup brace for the first few weeks, then a sleeve as symptoms settle. The goal remains identical: reduce pain, enable quality movement, and prevent re-injury.
Ankle Sprain Recovery Time and Healing Stages
Grade 1 Sprain Recovery Timeline
Grade 1 is a stretched ligament with microtears. Swelling and bruising are modest, and walking is often possible with care. I anticipate early improvements within several days and functional recovery within roughly a couple of weeks, depending on work and sport demands. That timeline shortens when sprained ankle home treatment is applied consistently and exercise is introduced early without provoking pain.
I still advise progressive loading. Too much, too early can prolong symptoms. Too little, for too long builds stiffness.
Grade 2 Sprain Recovery Timeline
Grade 2 involves a partial tear and more pronounced swelling. Walking distance and pace are often limited. Ankle sprain recovery time here extends further, and sport return requires patience. I look for steady reductions in swelling over the first fortnight with a gradual shift to strengthening by the end of that period. Many people regain normal daily function in the ensuing weeks, while sprinting and cutting movements return later with criteria-based testing.
Soft tissue healing has a rhythm. Respect it and progress accelerates. Ignore it and progress stalls.
Grade 3 Sprain Recovery Timeline
Grade 3 is a complete ligament tear with marked instability. Crutches, a controlled brace, and clinical supervision are prudent. The early stage focuses on swelling control, protected motion, and safe gait. Functional recovery takes longer and must include dedicated balance work to restore proprioception. Some cases require imaging and orthopaedic input to rule out associated injuries. Sprained ankle home treatment still helps, but it sits alongside clinical care.
Patience is not passive. It is targeted, progressive work while tissue biology catches up.
Factors Affecting Healing Speed
-
Initial management quality: Early swelling control and protected movement shorten recovery.
-
Load management: Walking volume, stairs, and standing time must match symptoms.
-
Strength baseline: Strong calves and peroneals absorb load efficiently.
-
Balance capacity: Poor proprioception delays confident return to uneven ground.
-
History of sprains: Previous injury can slow ligament healing and degrade stability.
-
Sleep and nutrition: Adequate protein and consistent sleep support tissue repair.
None of these factors act alone. They compound, for better or worse.
Exercises and Rehabilitation for Faster Recovery
Early Mobility Exercises
Movement restores function. I introduce these as soon as swelling stabilises and pain allows:
-
Ankle pumps: Move the foot up and down in a pain-free range. Frequent, short sets.
-
Alphabet tracing: Draw the alphabet in the air with the big toe. This explores gentle multi-directional motion.
-
Supported weight shift: Stand holding a surface and transfer weight toward the injured side without pain.
-
Seated towel slides: Slide the foot forward and back on a towel to encourage dorsiflexion and plantarflexion.
These exercises keep joints gliding and reduce protective guarding. Small inputs, repeated often, work best.
Strengthening Exercises
Strength protects the ankle from repeat injury. I prioritise the peroneals, calves, and intrinsic foot muscles.
-
Isometric eversion: Press the foot outward into a fixed object. Hold, then relax. No pain provocation.
-
Theraband work: Perform eversion, inversion, dorsiflexion, and plantarflexion with light resistance.
-
Calf raises: Start double-leg on flat ground. Progress to single-leg and step edges when comfortable.
-
Towel curls: Scrunch a towel with the toes to activate intrinsic foot muscles.
I progress load when form remains crisp and symptoms do not increase two hours after training. That delayed check guards against overconfidence.
Balance and Proprioception Training
Balance work is non-negotiable. The ankle must relearn to react. I start with:
-
Single-leg stands: Hold on to a counter initially, then reduce support.
-
Head turns and arm reaches while balancing: Challenge position sense.
-
Pillow or foam standing: Add instability to build reactive control.
-
Clock reaches: Tap points around the body like a clock while standing on the injured leg.
Later, I integrate hop and stick drills, side shuffles, and gentle cutting patterns. The sequence is stable stance, then dynamic control, then sport-specific moves.
Return to Activity Guidelines
I use criteria, not dates. A return to running or change-of-direction sport requires:
-
No swelling increase overnight after a full day of normal activity.
-
Pain-free hopping in place on the injured side for several repetitions.
-
Equal single-leg balance time on both sides without wobble or compensation.
-
Full, comfortable range of motion compared with the other ankle.
-
Confidence during brisk walking, stairs, and short jogs on level ground.
Progress is rarely linear. It improves, plateaus a little, then improves again. And yet, disciplined progressions consistently win.
Making a Full Recovery from Your Sprained Ankle
Full recovery is a combination of quiet tissue healing and visible skill. I build it in three layers that sit on top of sprained ankle home treatment:
-
Capacity: Restore strength and range beyond pre-injury levels. Stronger tissues tolerate surprise loads.
-
Control: Regain balance in varied conditions, including eyes-closed and unstable surfaces. Control prevents repeat sprains.
-
Confidence: Rehearse movements that previously caused the sprain. Controlled exposure rebuilds trust.
Two pragmatic tips help. First, keep some form of balance work twice weekly for several months. Second, use an ankle brace during higher-risk tasks for a short period while the ligament remodels. I call this the belt-and-braces phase. It is temporary and effective.
One more note. If pain persists despite careful management, I escalate. Imaging, a rehab review, or an orthopaedic opinion can reveal occult issues. A smart referral saves time and frustration.
Quick Reference: At-a-Glance Guide
|
Topic |
Practical Guidance |
|---|---|
|
Initial focus |
RICE, protected weight bearing, and elevation as the anchor of sprained ankle home treatment. |
|
Swelling control |
Frequent elevation, snug compression, brief cold sessions, and gentle ankle pumps. |
|
Wrapping check |
Snug, not tight. Warm toes, no tingling, reduced pain during walking. |
|
Exercise start |
Begin with mobility, then strength, then balance, then impact and change of direction. |
|
Red flags |
Inability to weight bear, severe pain, numbness or deformity. Seek medical assessment. |
|
Return to sport |
Criteria based: no swelling rebound, pain-free hops, equal balance and full range. |
Two final points frame the whole approach. First, ankle sprain recovery time depends less on the date of injury and more on the quality of each week’s work. Second, consistency beats intensity in sprained ankle home treatment. Small, correct steps taken often are what restore durable function.
Frequently Asked Questions
Can I walk on a sprained ankle after 2 days?
Yes, if walking is pain-free or only mildly uncomfortable and swelling is not increasing afterward. I keep steps short, surfaces level, and pace controlled. If pain spikes during or after walking, I reduce load and return to structured sprained ankle home treatment for another day.
Should I sleep with my ankle wrapped?
Yes, provided the wrap is comfortably snug and does not cause tingling, numbness, or colour change. I elevate the ankle on a pillow and recheck tension after a few minutes in bed. If there is any doubt, I loosen or rewrap. Comfort and circulation outrank tightness.
How long should I ice my sprained ankle each day?
Short, regular sessions work better than one long session. As Cleveland Clinic notes, brief applications of 15-20 minutes spaced across the day during the first 48 hours are effective. I always use a cloth barrier and monitor skin sensation.
What’s the difference between a sprain and a fracture?
A sprain is a ligament injury. A fracture is a bone break. Both can produce swelling and bruising. Inability to bear weight, bony tenderness, visible deformity, or pain that does not improve with sprained ankle home treatment warrants medical assessment. When uncertain, I err on the side of imaging.
Can a sprained ankle heal in 3 days?
Symptoms can improve quickly with prompt care, but full tissue healing takes longer. Light daily tasks may feel easier after a few days, especially with consistent elevation and compression. Sport and heavy work require more capacity and control than three days allows.
Should I use heat or ice after the first week?
During the first week, I prefer cold to manage swelling. After the acute phase, gentle heat can help stiffness if swelling has settled. I use heat before mobility work and finish with brief cold if swelling threatens to return. The sequence matters more than the label.
Sprained ankle home treatment works best when actions are small, frequent, and symptom led. Manage swelling early. Move with intent.